
←Part 1: What are contextual assistants?
How to Create a Minimum Viable AI Assistant
Building a contextual assistant starts with building a simple minimum viable assistant. From there, you can add advanced capabilities and improve using real user conversations. In this series, we’ll cover everything you need to build your own contextual assistant and go from proof of concept to production. In this post, we’ll create a minimum viable assistant.
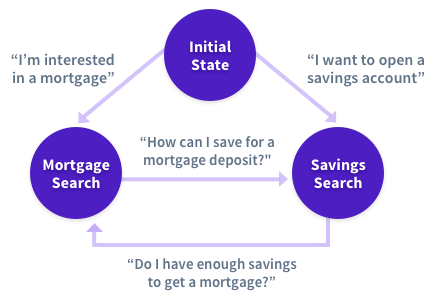
A minimum viable assistant is a basic assistant that can handle happy path stories. A happy path is when the user provides the information requested by the contextual assistant. An unhappy path is all possible edge cases where a user might digress from the happy path by asking a followup question, engaging in chitchat, looping back to an earlier topic. You’ll soon find that most real user conversations are unhappy paths.
Why start with a basic AI assistant?
A basic assistant that can handle most happy paths is relatively easy to handle in code. Handling unhappy paths in code, however, is incredibly difficult. Real user conversations don’t follow conditional logic. Real users will surprise you and act in ways you can’t anticipate.
To clarify, rules and business logic are still needed in most contextual assistants. And you might be able to get away with state machines in the beginning.
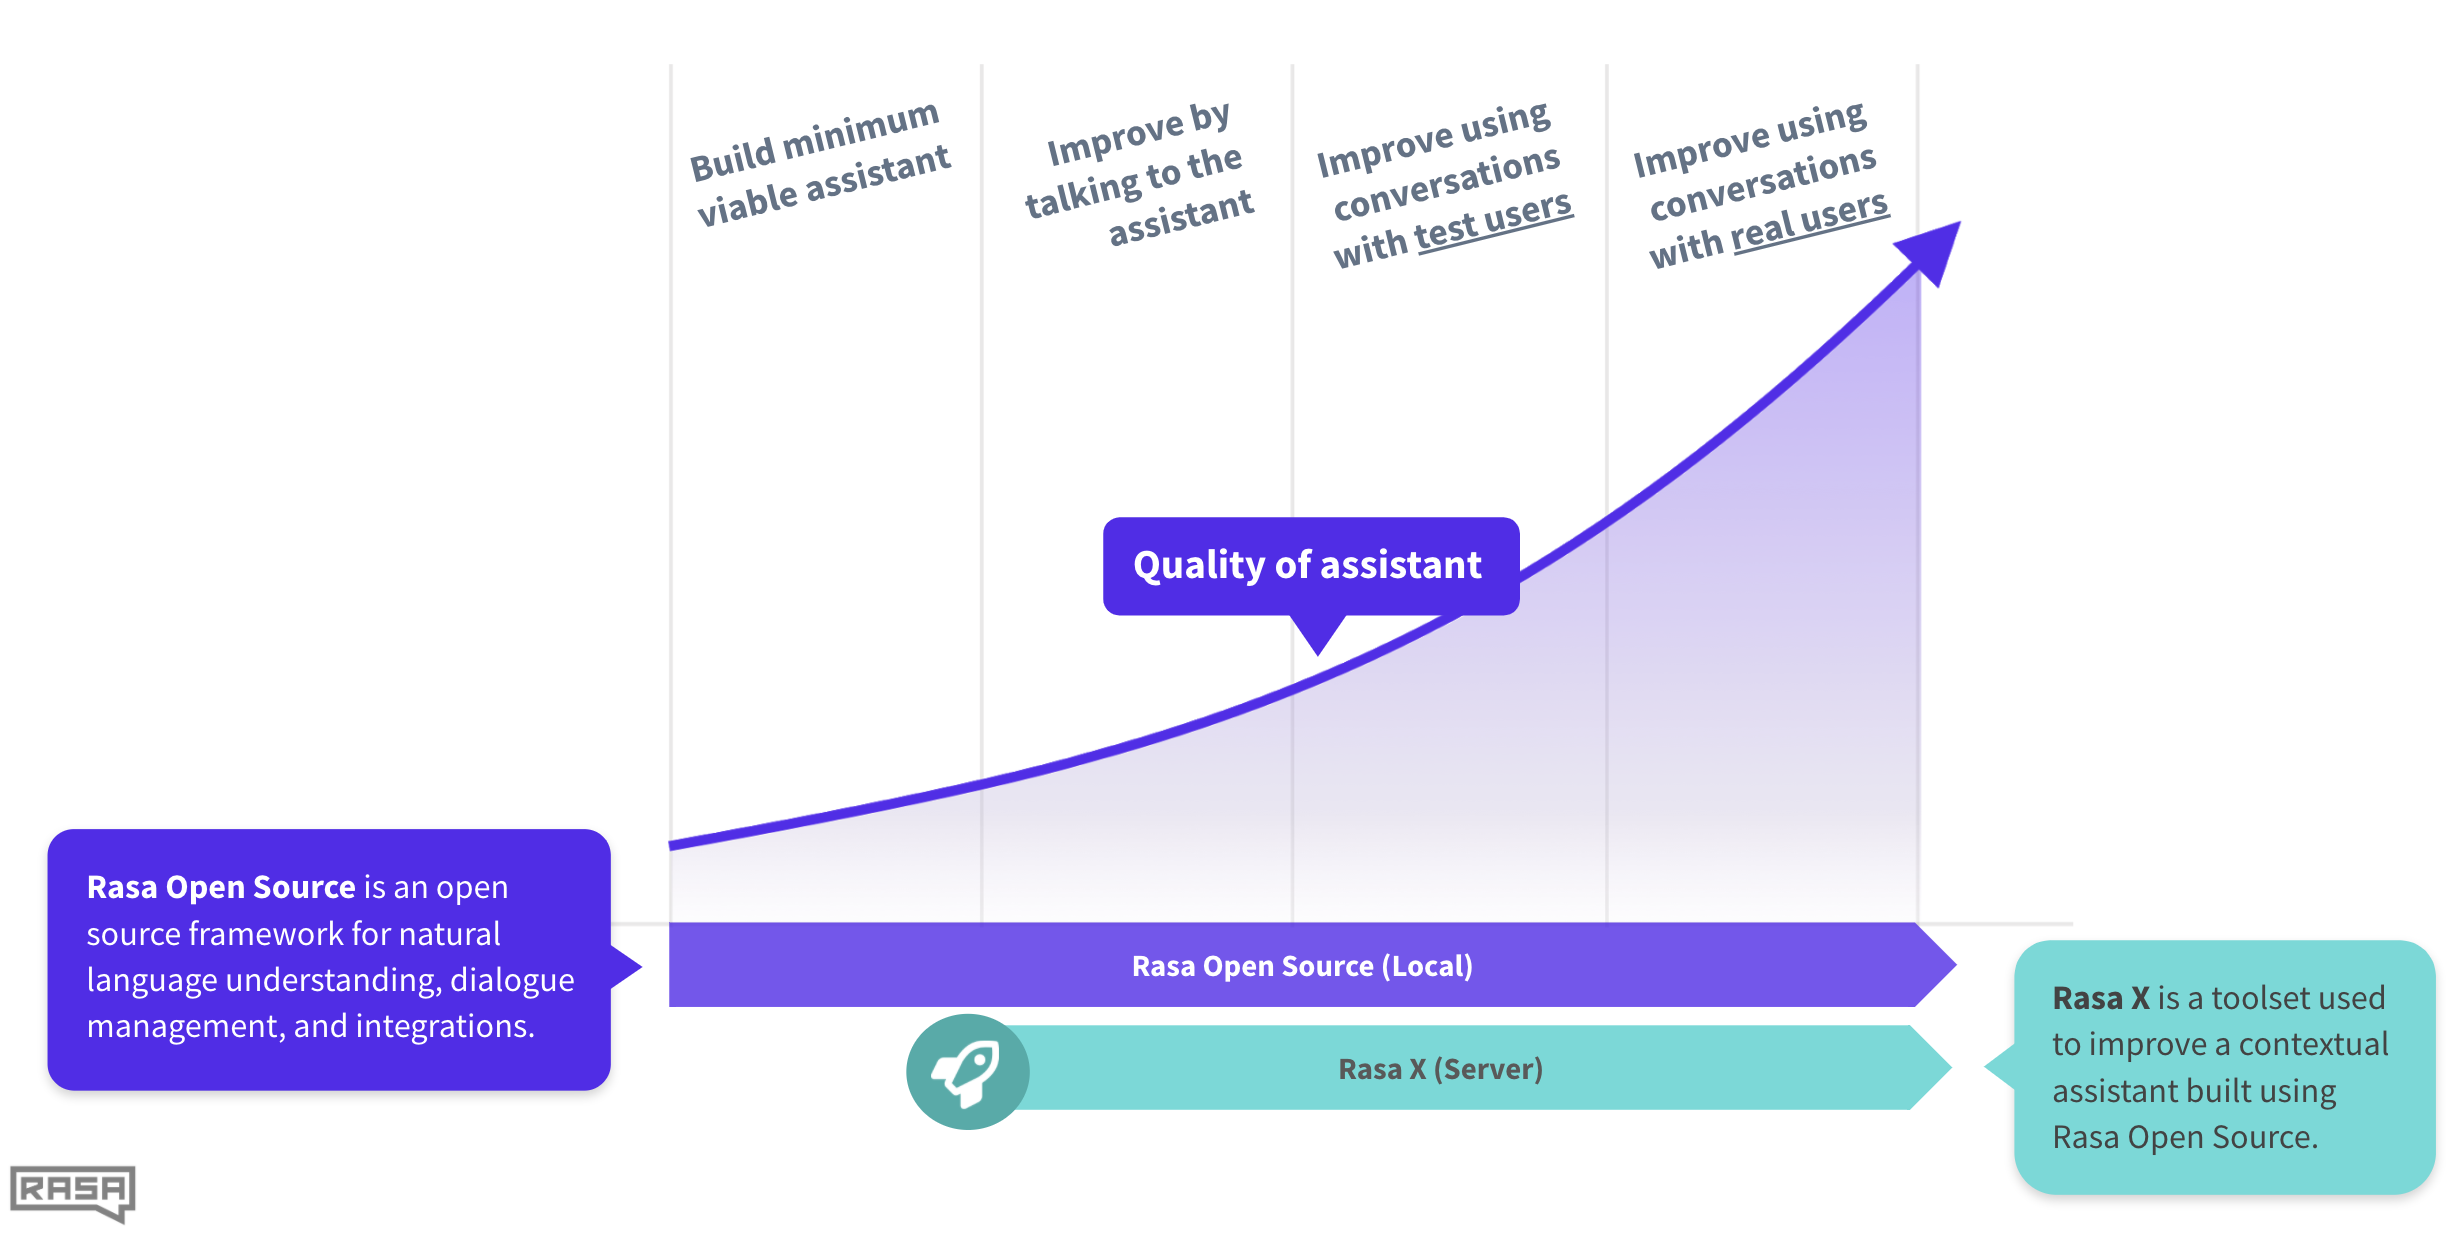
But when you start to test it with real users and add more capabilities, it very quickly becomes incredibly messy, unmaintainable, and difficult to scale.
.jpg?width=512&name=unnamed%20(1).jpg)
For these reasons, we recommend building a simple assistant that covers most of your happy paths. Then, use a toolset like Rasa Enterprise to test and improve it with real user conversations.
Setup
Before we install Rasa Open Source, we have to install Python. As a best practice, we can create a virtual Python environment.
First, install and set up Python 3.6 or 3.7. For folks that have a Mac and like to use Anaconda, let’s use the open source “Anaconda Individual Edition”. You can also use popular OS specific package managers like brew (macOS), chocolate (Windows), apt (Ubuntu) to install and setup Python.
Download the macOS graphical installer and run the installer. Then, launch the Anaconda Navigator app and create a new virtual Python environment. Select Python version 3.7 as the runtime. Let’s name this new virtual environment “rasa”.
Activate the “rasa” virtual environment by running the following command in your terminal
conda activate rasa
Now, let’s install Rasa Open Source using pip. Run the command below. Note that we’re going to use the latest version of Rasa (which at the time of this post is 1.9.3).
pip3 install rasa==1.9.3
The next step is to create a new Rasa project. To do this, run
rasa init
The rasa init command creates all the files that a Rasa project needs and trains a simple bot on some sample data.
Files and configuration
Before we start adding data to the assistant, let’s familiarize ourselves with some of the files we’ll be working on.
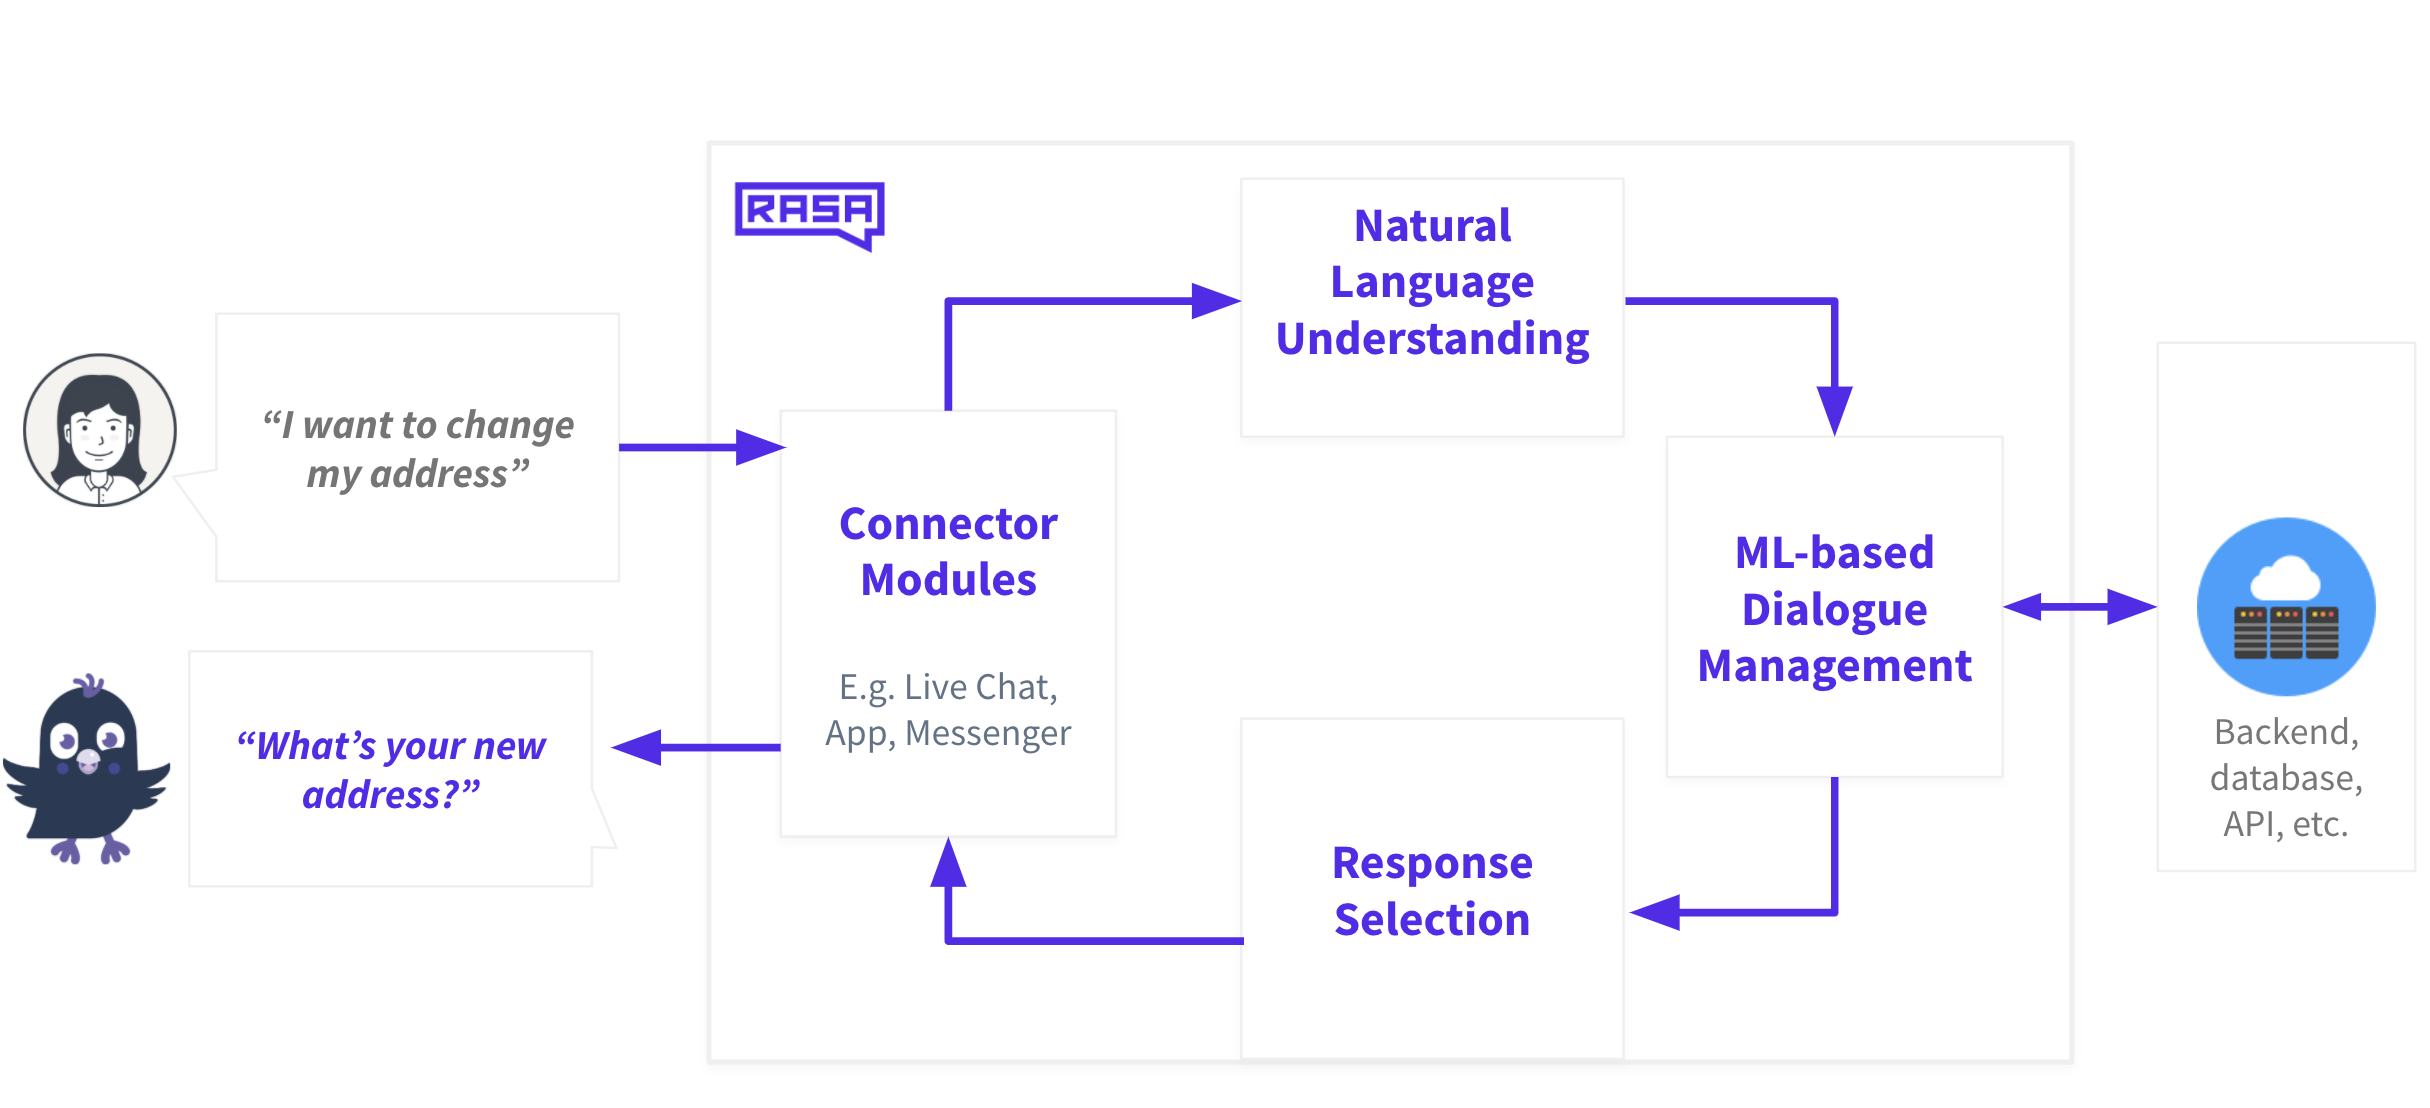
Rasa Open Source does two things: natural language understanding (NLU) and dialogue management. To better understand this, let’s imagine you’re talking to a financial banking assistant. The purpose of this assistant is to answer questions about your spending habits, transaction history, and account information. You want to know how much money you spent at a particular vendor last week.
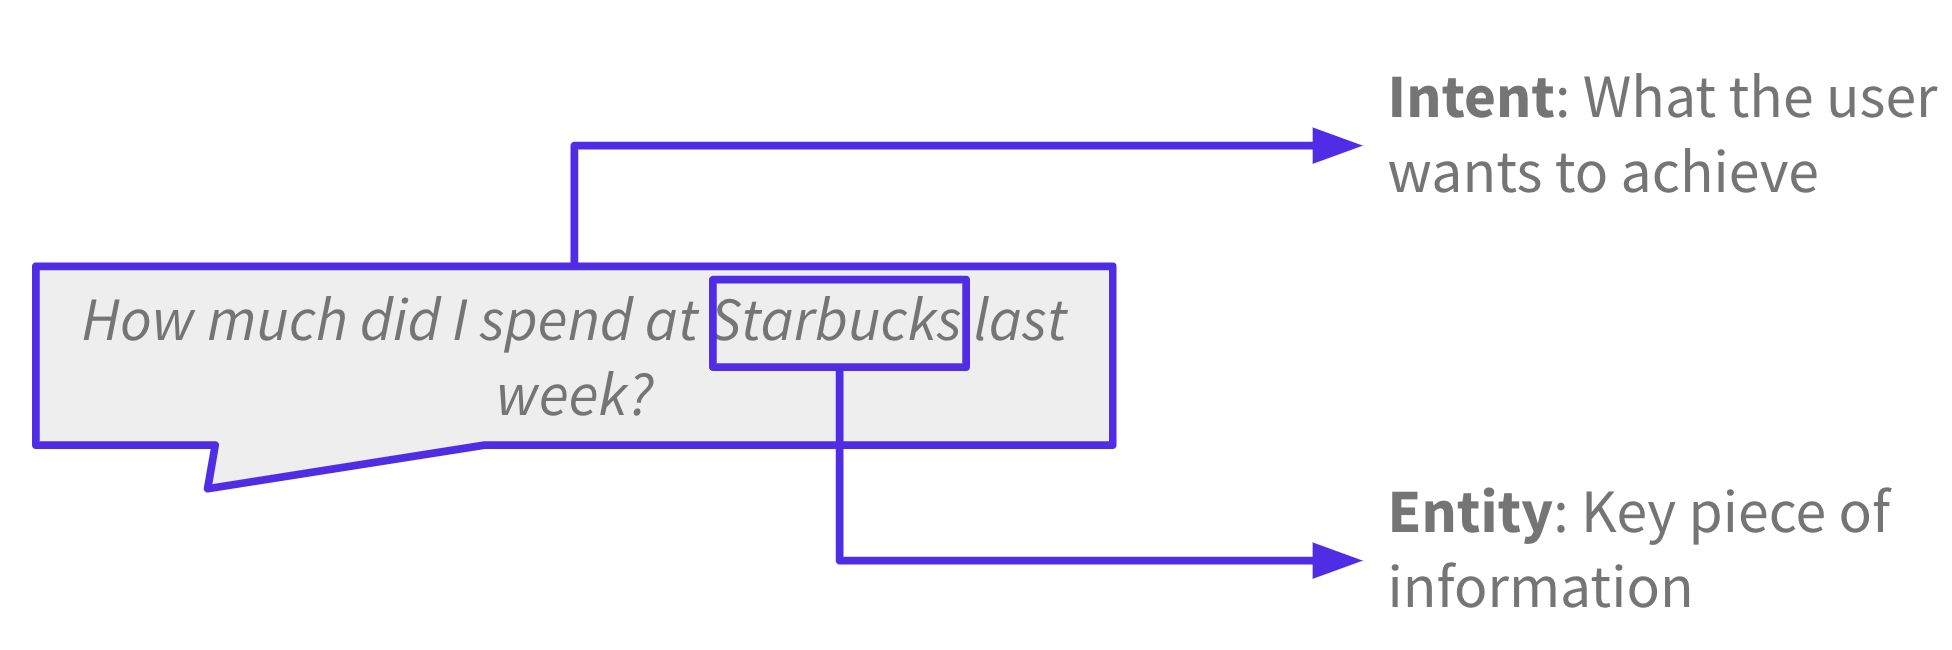
The goal of NLU is to extract structured information from messages. The most important parts of a message are intents, what the user wants to achieve, and entities, key pieces of information. In this case, the intent is to inquire about your transaction history and the entity is the vendor, Starbucks.
The goal of dialogue management is to process the NLU output and respond to the user with a message. Under the hood, a tracker component keeps track of the conversation. When the interpreter component sends the NLU output, the policy component uses the current state of the conversation and machine learning policies to predict the next best action.
In this case, it’s to call an API to search for the user’s transaction history and respond with the requested information. The response is sent to the user and the tracker gets updated with this action. These steps occur every time a user talks to the assistant.
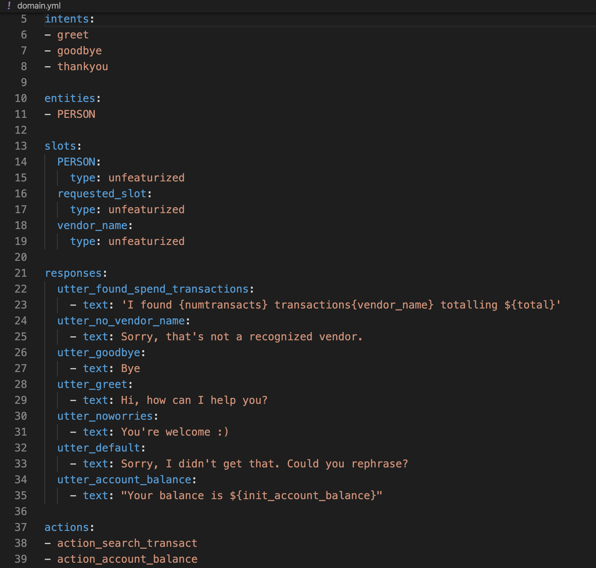
What does the domain file do?
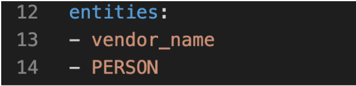
Now let’s look at the specific Rasa pipeline components and policies that make that happen. Let’s start with the domain.yml file. The domain file defines the world of your assistant. It’s used to define intents and entities, which are things your assistant can understand. It’s used to define slots and responses, which are things your assistant can remember and respond with. It’s also used to define actions, which are things your assistant can do.
What does the config file do?
The config.yml file has two components: pipeline and policies. Pipeline defines the NLU component and policies define dialogue management.
First, let’s look at the pipeline. Specify the language of your pipeline. In our case, the financial assistant’s language capabilities are limited to English.
Our pipeline uses the new joint NLU architecture called DIET, or Dual Intent and Entity Transformer. It’s a multi-task transformer architecture that handles both intent classification and entity extraction together. It also provides the ability to plug and play various pre-trained embeddings like BERT, GloVe, ConveRT, and so on.
The pipeline also uses tokenizers and featurizers to process and represent the input text. We’ll discuss what each of those components do in detail later.
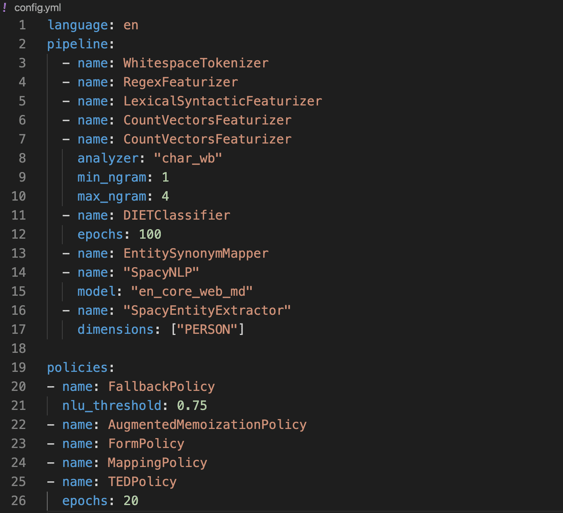
Now, let’s look at the policy files. Policy defines dialogue management and uses a combination of rules and machine learning to predict the next best action or response. The FallbackPolicy provides a way for your assistant to fail gracefully if it doesn’t know how to respond to a particular statement or question. In this case, if the confidence threshold is below 0.75, it will respond with the fallback message of “Sorry, I didn’t understand you.”
The MemoizationPolicy memorizes the conversations in your training data and predicts the next action with confidence 1.0 if it finds a match or predicts None with confidence 0.0 if it doesn’t. The AugmentedMemoizationPolicy offers a twist on the classic MemoizationPolicy; it will forget certain events until it’s able to find a match.
The policy file also contains a machine learning policy for dialogue called Transformer Embedding Policy (TED). Remember when we talked about unexpected user behavior? The TED policy is particularly good at handling these types of multi-turn interactions. It uses a transformer architecture to decide which dialogue turns to pay attention to and which to selectively ignore when making predictions on which action the assistant takes.
What does the nlu.md file do?
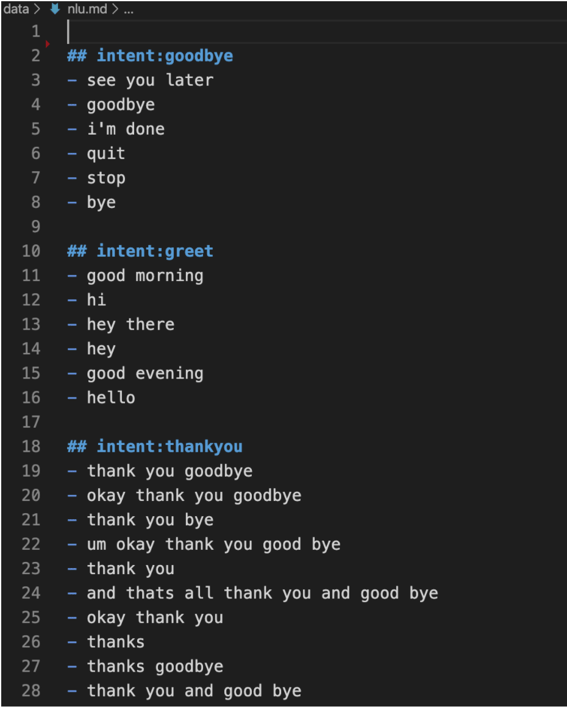
Now that we’re familiar with some of the setup and configuration files, let’s turn our attention to creating intents and entities. You can do this in the nlu.md file.
Let’s start by adding some training examples to each of the intents like in the file below.
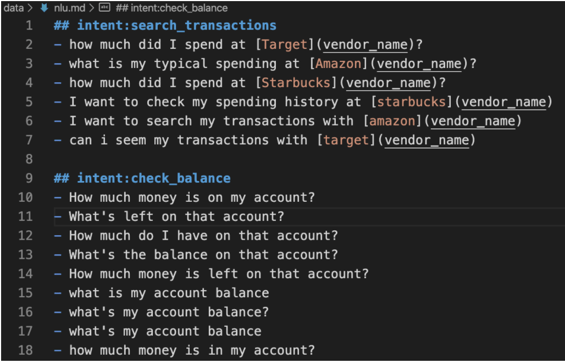
Let’s add two new intents to the financial assistant.
Now, let’s define these intents in the domain file.
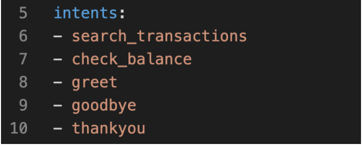
You’ll find that the training examples for the search_transactions intent contains some entities. We’ll need to define these entities in the domain file.
The financial assistant now knows how to identify these new intents, but we also need to provide responses. Let’s do that in the domain file.

Notice that the response text for utter_found_spend_transactions and utter_account_balance contains placeholders. These placeholders will be replaced with slots. We’ll cover slots in the next post.
Train your model
We can now retrain the initial model and test the assistant by running the following command:
rasa train
After your model is trained, run the following command to interactively test and talk to your assistant:
rasa shell
The assistant should be able to respond to the intents we’ve created.

In this post, we created a simple assistant that can understand a few basic commands. We learned about the various components that make this happen. We also trained our model and tested the assistant. In the next post, we’ll learn about conversation design and additional capabilities to the assistant.